How to Change a Toilet Flapper in Under 5 Minutes Flat
Reading Time: 5minutes
Published September 23, 2024 | Updated August 20, 2025
Is your toilet constantly running? You might have heard that a faulty flapper is often the culprit. In this post, we’ll walk you through what a toilet flapper is, why it can cause a toilet to run, and why it might not be the only problem at hand. We’ll also show you how to change a flapper on your own, but remind you that sometimes a running toilet means deeper issues, like water pressure problems, that may require a professional touch.
What Is a Toilet Flapper and How Does It Work?
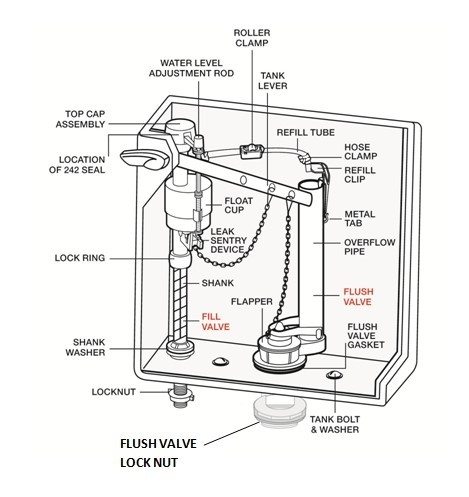
A toilet flapper is a rubber or plastic valve inside the tank of your toilet. The flapper is connected to the fill valve at the bottom of your toilet tank, and is also connect to a chain. The chain connects to the toilet handle lever. When you flush, the toilet handle lever lifts, and this pulls the flapper open, almost like a little door. While the flapper is open, water flows from the tank into the toilet bowl. Once enough water has gone into the bowl, the flapper falls back into place, sealing the tank. Then, rather than going into the bowl, the water stays in the tank, refilling, so that it can flush next time. In short, the flapper controls the flow of water from the tank to the bowl and is critical to how your toilet functions.
Diagram provided by Fluidmaster, which supplies high quality toilet parts.
Why You May Want to Change Your Toilet Flapper
A common symptom of a faulty flapper is a constantly running toilet. This happens because the flapper isn’t creating a proper seal, letting water slowly leak from the tank into the bowl. Not only does this waste water, but it can also lead to higher utility bills. So, if you notice your toilet running longer than it should after a flush, replacing the flapper is a good place to start.
Why Changing the Flapper Might Not Solve the Problem
While a worn-out flapper is often blamed for a running toilet, replacing it doesn’t always fix the issue. A flapper is a fairly basic part, without many components to wear out. Tank tablets used for cleaning can be a problem. If you use these tablets, it could be more likely that the flapper is the problem. These tablets can eat away at the seals and gaskets in your toilet, causing them to wear out faster. These tablets can also cause issues in your fill valve and flush valve. Even when the flapper is the problem, it’s generally not the only problem.
The Other Potential Culprits
This is why we normally recommend, at minimum, changing all off the components of your toilet tank. Chaning just one part rarely fixes the problem. The flapper is the most basic part of your toilet tank, and therefore the least likely to fail on its own. We recommend changing the fill valve and flush valve when replacing a flapper. These valves are more tricky. With enough youtube videos and trial and error, a handy homeowner could probably replace these. However, there is a chance of causing flooding or letting an oversight from inexperience stand in the way. If the project expands beyond replacing the flapper, we recommend considering calling in a professional. A professional will have the correct materials and the experience to solve your problem quickly and efficiently.
Your Toilet Might be Feeling the Pressure
If you’ve changed the flapper and your toilet is still running, the problem might also be related to the water pressure in your home. If you have more than one toilet running, it could be a sign that your water pressure is too high or fluctuating in a way that prevents the toilet from functioning correctly. The water pressure in your home should stay between 60 and 80 psi. If your pressure is unregulated, you’ll want to get that fixed fast, and should call a professional plumber to do so. In many cases, a rebuild of the toilet’s internal parts may be necessary along with a pressure regulating valve replacement.
Little known tip: if you notice the toilet or toilets running more at night, you may have a water pressure issue. You, or a trusted plumber, can conduct a 24 hour water pressure test if you have signs of high pressure but don’t find it to be too high during the day.
Finding the Right Flapper for Your Toilet
Before you rush to the hardware store, it’s essential to understand that not all flappers are created equal. While some flappers are labeled “universal,” they don’t work with every toilet model. Toilets are designed with different-sized flush valves, which means the flapper needs to fit perfectly for a proper seal. Check your toilet’s manufacturer details or bring your old flapper with you to ensure you’re purchasing the correct type.
Step-by-Step Guide: How to Replace a Toilet Flapper
Replacing a toilet flapper is a simple task most homeowners can tackle. Follow these steps to see if replacing the flapper fixes your running toilet problem.
Here’s how to do it:
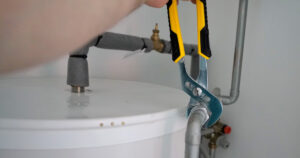
Turn off the Water Supply
Locate the shut-off valve behind the toilet and turn it clockwise to stop water flow.
Note: be very careful when working with shut off valves. Some of these valves are very old and may leak or fail to turn off the water when closed. If the valve connects to cpvc (which may not be visible without cutting into drywall or other investigative measures) use extreme caution. CPVC gets very brittle over time and can easily crack and leak. You’re dealing with pressurized water here, which can quickly flood a home. You may consider turning off the water to the whole home for extra caution.
Drain the Tank
Flush the toilet to empty the tank. Hold the lever down to drain as much water as possible. You can use a sponge, towel or shop vac to remove any remaining water from the tank.
Remove the Old Flapper
Detach the chain from the flush lever, then unclip the flapper from the sides of the overflow tube. Carefully remove it from the tank.
Install the New Flapper
Attach the new flapper to the overflow tube by clipping it onto the same brackets where the old one was attached. Then, reattach the chain to the flush lever, leaving a little slack to ensure it can lift and close the flapper smoothly.
Test the New Flapper
Turn the water supply back on and let the tank refill. Flush the toilet and watch to make sure the new flapper seals properly. Adjust the chain if necessary to ensure the flapper closes tightly and stops the water from flowing once the tank is full.
Sometimes, It’s More Than the Flapper
Replacing a toilet flapper can be a quick DIY fix for a running toilet, but remember that sometimes the problem runs deeper. If you’ve tried changing the flapper and your toilet still won’t stop running, it could be a sign of a water pressure issue or a more complex internal toilet problem. In that case, it’s best to call an experienced plumber to diagnose and repair the issue before it leads to bigger headaches (and water bills). The team at Aaron Services: Plumbing, Heating, Cooling is ready to help with any plumbing issue you may have! If you don’t have the time, materials or expertise to fix your running toilet, let our team do what we do best – bring you Peace of Mind with our 5 Star Service and Value.